.svg)


As software engineers, we often find ourselves in circumstances where we are unable to distinguish between different possibilities and decide which library is the best fit for our purposes.
Developers using React JS have access to a number of testing libraries and tools for component-level testing, including as Enzyme, Jest, and the Testing Library. Modern web development requires component testing, particularly for large apps developed with React.
This detailed blog on migrating from Enzyme to React Testing Library will explain how to migrate your test automation suite to React Testing Library and understand the pros and cons of doing so. If you want to see a comparision between React-testing-library vs Enzyme then read here.
What exactly is Component Testing and why do we need it?
It is well known that React is a component-based user interface library that comprises two kinds of components: functional and class components. Class components are similar to JavaScript classes, and functional components are similar to JavaScript functions. Prior to learning React, one must have a fundamental understanding of JavaScript fundamentals.
The functional component is most likely what you will use, and core React developers encourage you to design functional components as well. Your application's layout logic will incorporate each element, and when combined, they complete the whole.
You can perform several types of tests, such as component testing and unit testing, if your component is merely a basic user interface. This way, you won't need to complete as many functionality checks. To make sure that more complicated components are functioning as intended, it's crucial to carry out exhaustive unit testing in React if they have states or depend on particular behaviors.
The kind of testing known as component testing focuses on individual code units, or components in this context. The primary goal of component testing is to make sure that every component functions as intended, whether it be a class or functional component.
The majority of online apps employ some kind of input form to get data from users; therefore, it's critical to make sure the implementation is operating as planned to avoid losing out on potential clients.
By ensuring that every function you have created is operating accurately and consistently, component testing improves user experience.
While Enzyme and React Testing Library are both options for component testing in React, React Testing Library is often considered a better choice for several reasons, and even the official React team recommends using React Testing Library.
What is Enzyme?
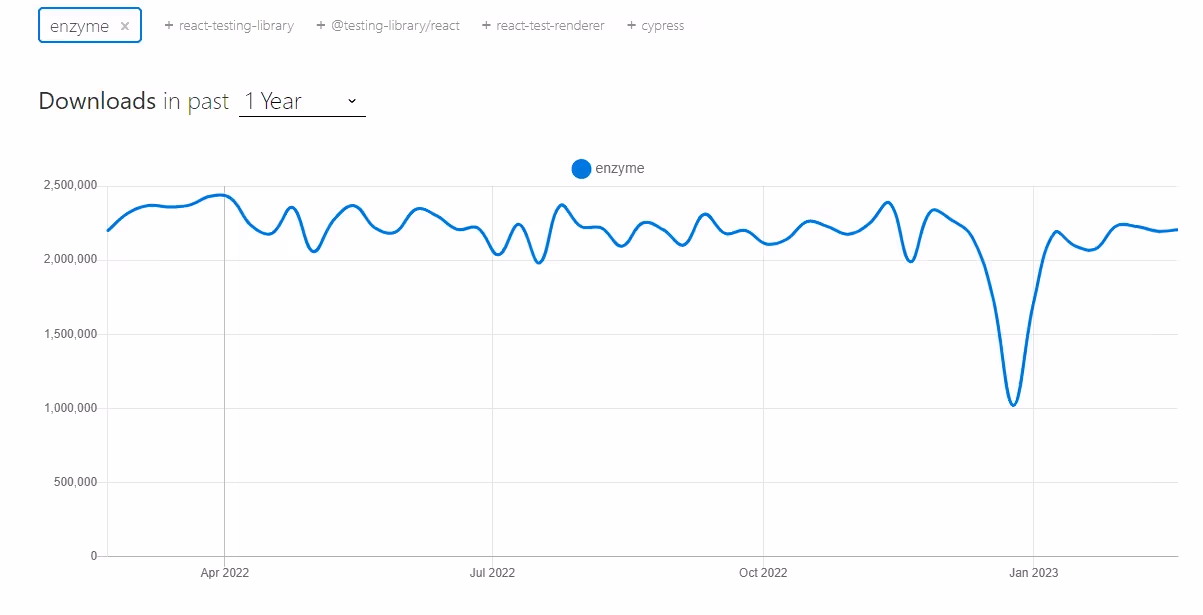
Enzyme is an open-source JavaScript library that makes React testing easier. It has over 2 million weekly downloads on npmjs.com
Enzyme allows you to browse, manipulate, and simulate runtime in certain ways based on the output. Enzyme's DOM manipulation and traversal API is designed to be as flexible and user-friendly as jQuery's.
In the past three years, Enzyme has only released one release, and it doesn't seem like they want to keep working on it. Since the world of development is always evolving, as developers we are aware that Enzyme is unable to provide the finest testing features for contemporary web development, and this situation does not appear to be improving anytime soon.
Despite the lack of an official Enzyme adapter for React 17, its developer produced a temporary adapter that, with 16 million downloads, has become the de facto default adapter. But all this has done is postpone Enzyme's ultimate demise and provide developers with a fictitious sense of security.
The project's author, Wojciech Maj, made a formal announcement at the end of 2021 stating that he had ceased working on it and that there would be no more updates.
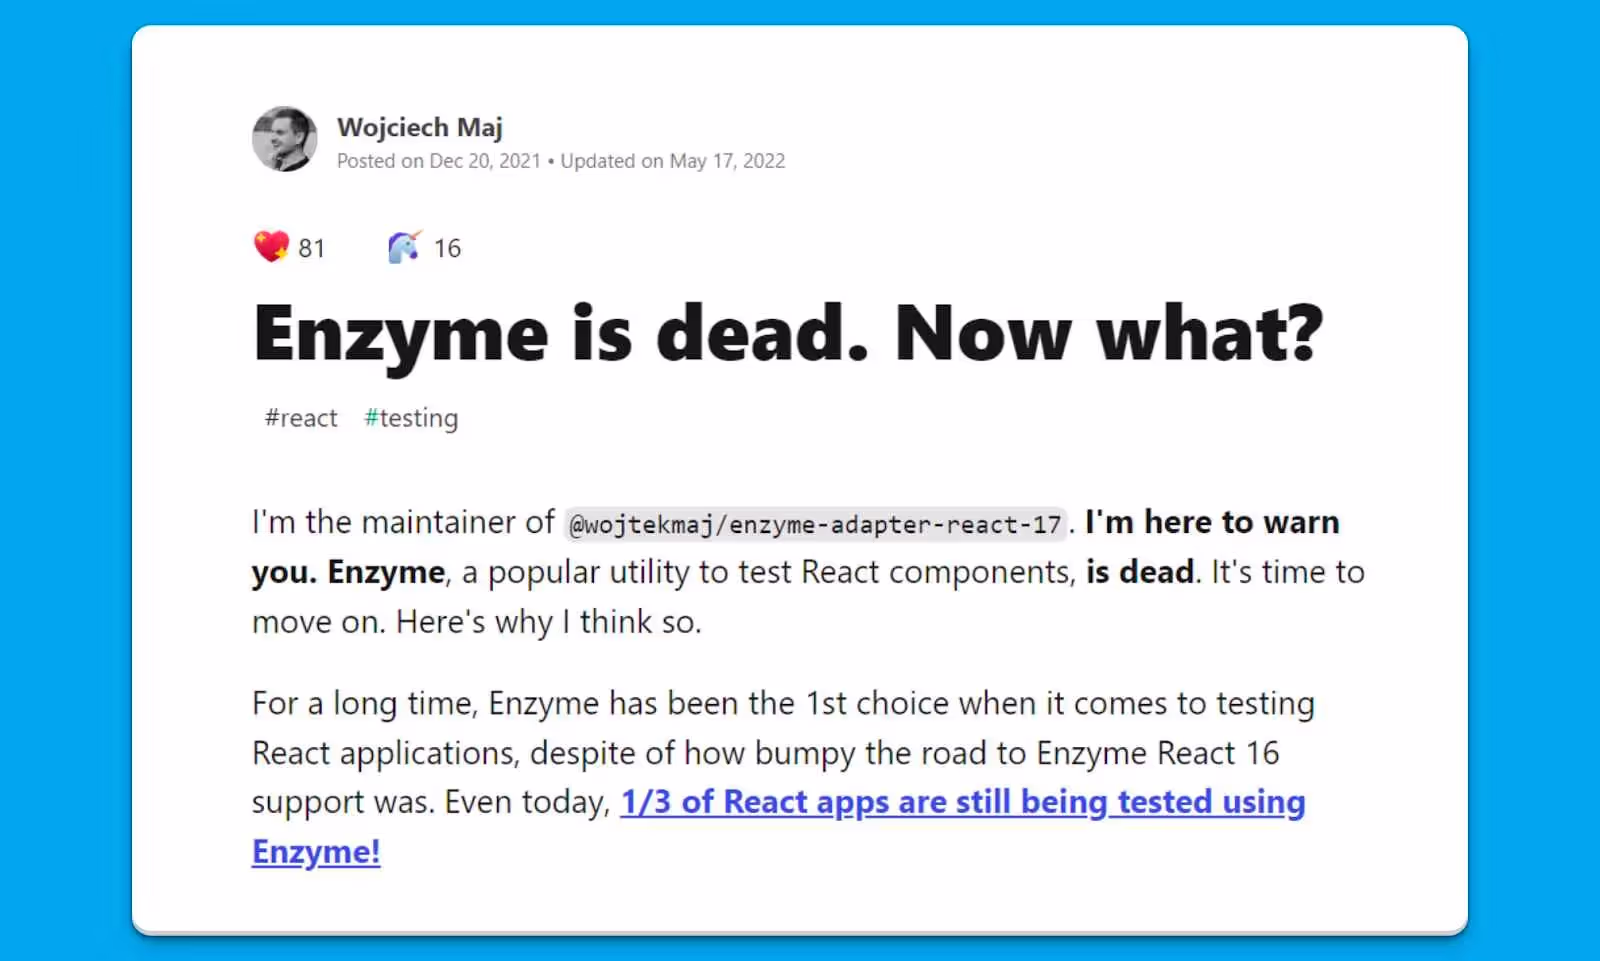
He also mentioned using the React Testing Library, which is a fairly new but officially accepted testing library for React.
What is React Testing Library
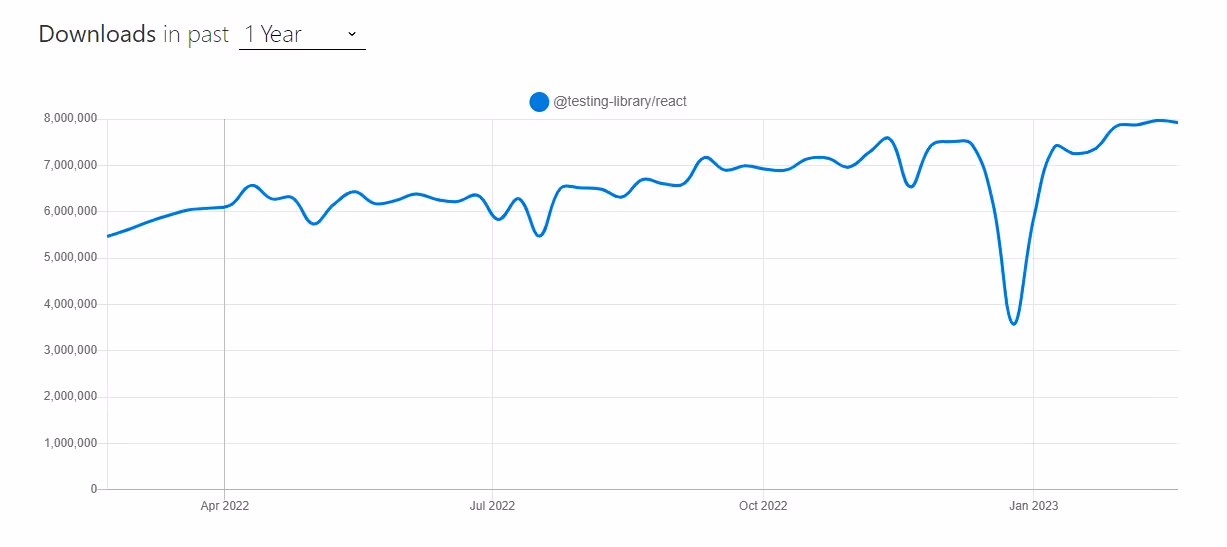
React Testing Library is another open-source JavaScript library that helps with react testing, and it has over 7 million weekly downloads on npmjs.com. It has around 17.5K stars on Github, and around 150+ developers are currently working on the project.
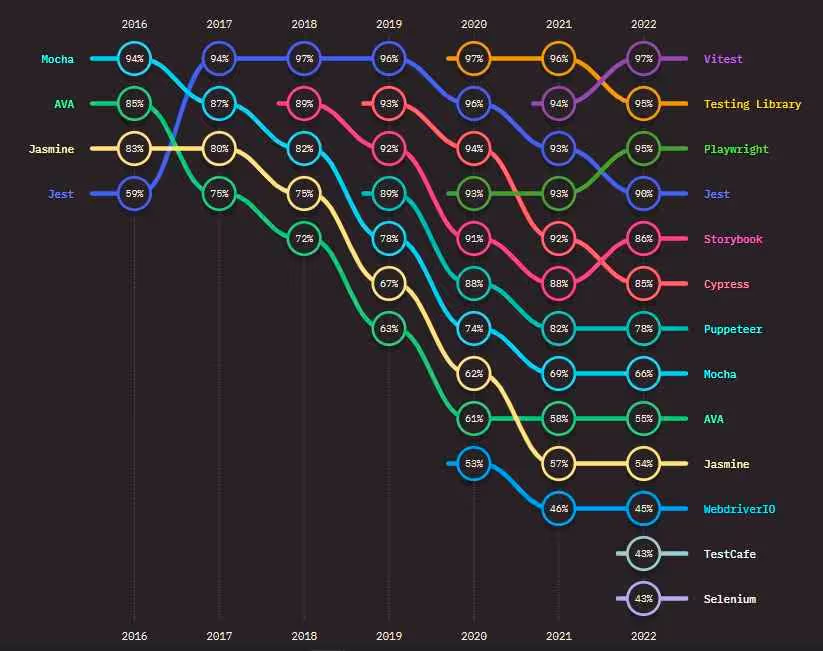
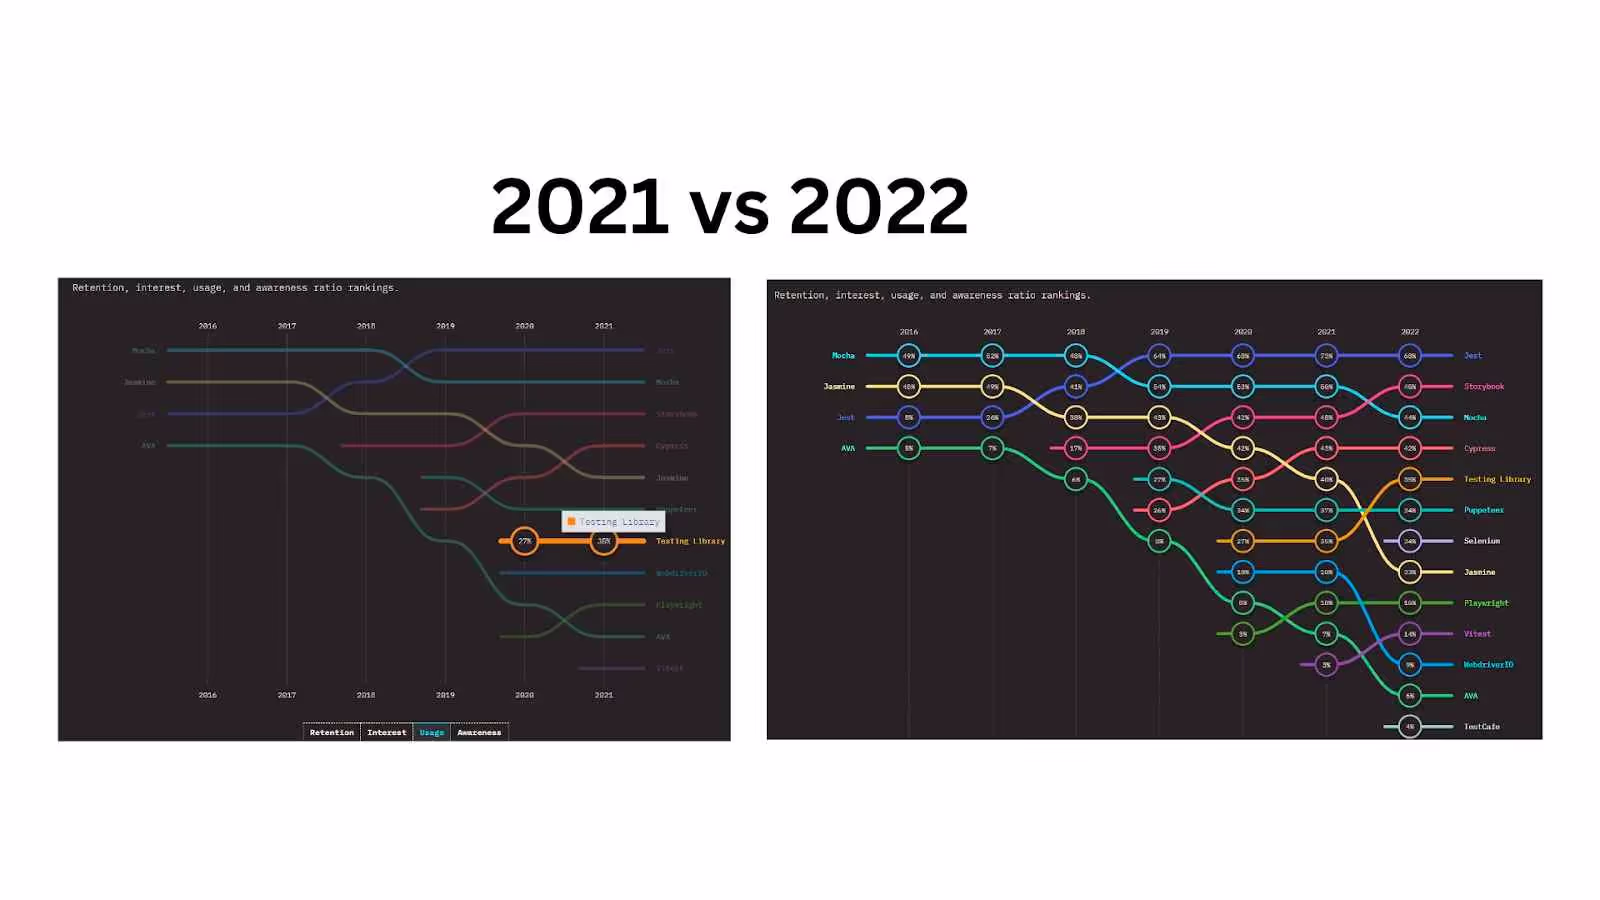
According to the state of JavaScript survey 2022, React Testing Library ranks 2nd in the retention metric and is steadily climbing the ladder.
The react-testing-library package family can help you test your UI components in a way that prioritizes the user experience for your website or app. The library’s guiding principle is “The more your tests resemble the way your software is used, the more confidence they can give you."
The main problem React developers face when writing tests is wanting to write maintainable tests that give them high confidence that their components are working for their users. That is, with the React testing library, developers can concentrate on the functionality of the component rather than the actual implementation.
Making the Switch from Enzyme to React Testing Library: A Step-by-Step Guide
To smoothly switch from Enzyme to React Testing Library, it's best to do it step by step. This means using both libraries at the same time in your application and gradually converting your Enzyme tests to React Testing Library tests one by one. This approach lets you migrate even large and complex applications without disrupting other businesses, as the work can be done collaboratively and over time.
Practical example for migrating to React Testing Library
Migrating from Enzyme to React Testing Library (RTL) can be a straightforward process if you follow a few best practices. But before diving into these practices, let's see what an actual migration of code looks like by comparing Enzyme and React Testing Library
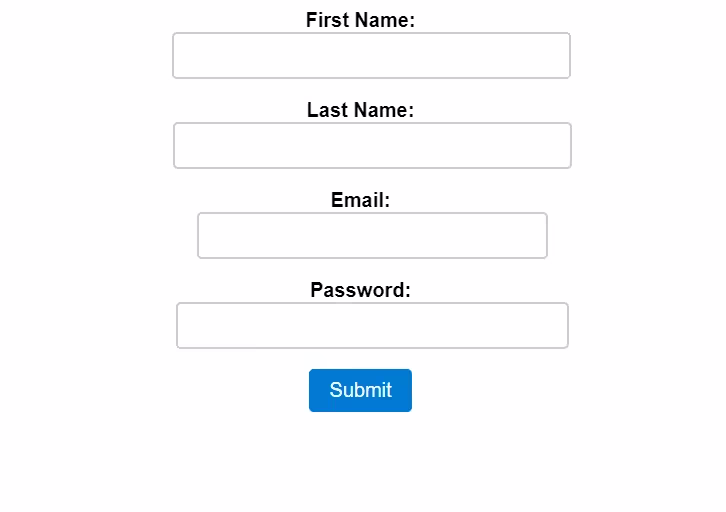
Here we have a React JS component with four text input elements, and throughout this blog, we will use this example.
The output will be like this
If you want to see the full code here is the source code
For this example, we will have three test cases here:
- The first test case checks if the Form component renders a form with four input fields and a submit button.
- The second test case checks if the state of the Form component is updated when the input fields change.
- The third test case checks if the onSubmit function is called with the form data when the submit button is clicked.
Here is an example of how the above test cases could be written using Enzyme:
Let's now convert it to the React Testing Library:
This second test case again uses the render method to load the component. It then uses the screen object to get the input fields by their label text using the getByLabelText query.
The test then uses the fireEvent.change function to simulate a change event on each input field. This updates the state of the component with the new values. Finally, it uses the toHaveValue matcher from the @testing-library/jest-dom package to check if the values of the input fields have been updated correctly.
The third test case will be updated with the following snippet of code:
This test case determines whether clicking the submit button causes the onSubmit function to be triggered with the form data. It makes a mock function called mockOnSubmit and gives it to the Form component as a prop.
After that, it uses the screen object from @testing-library/react to retrieve the input fields and submit button, fireEvent from the same library is used to mimic changes to the input fields and a click event on the button, and it declares that mockOnSubmit was called with the expected data.
Upon reviewing the code, it is evident that React Testing Library does not offer direct access to the props or component state, in contrast to Enzyme. Rather, it motivates you to test your component by engaging with the rendered result and asserting what should be displayed in a user-centered manner.
The variations discovered in our test suite are as follows:
- Usually, you would use the render method from @testing-library/react instead of the shallow or mount methods from Enzyme.
- To search for items, you would usually use one of the DOM query methods from @testing-library/dom, like getByLabelText, getByRole, or getByText, rather than Enzyme's find function.
- Usually, to interact with a component, you would simulate user interactions using the fireEvent utility from @testing-library/react, rather than directly accessing the component's state or properties.
- Typically, you would use the prettyDOM function from @testing-library/dom to obtain a string representation of the rendered output of the component rather than Enzyme's debug method for logging the component's output.
Remember that this is only a broad perspective, and you may wish to add more test cases as you work on code conversion, based on your needs.
The render method of the React Testing Library renders the component and all of its sub-components in a manner identical to that of Enzyme's mount method, in contrast to Enzyme's shallow renderer, as can be seen in this example.
It is not always necessary to assign the render result to a variable in the React Testing Library, meaning that a wrapper is not always required. Calling functions on the screen object will allow you to easily access the rendered output.
Another useful feature of the React Testing Library is that cleanup is automatically called in an afterEach or beforeEach function, so you don't need to do it after every test.
React Testing Library is one of those tools that people fall in love with right away since it makes creating more accessible applications easier (because inaccessible apps are more difficult to test).
However, even Enzyme's developer suggests starting again from scratch. Because React Testing Library is an alternative to Enzyme rather than a drop-in replacement for it.
Install React Testing Library
You can install the React Testing Library using the following command, you can use npm or yarn or pnpm, whichever one you prefer:
Import React Testing Library
You can import the library just like any library by running the following command
Here, the render function renders a component just like React, and the screen function is a utility for finding elements the same way the user does.
Rendering the component
You can render the component almost in the same way as Enzyme, the main difference is we use the wrapper in Enzyme and Screen in React Testing Library.
In Enzyme:
In React Testing Library:
In the React Testing Library, you can access the result of the rendered component without assigning it to a variable by using the "screen" object's functions.
Let’s now look at how you will achieve some tests in Enzyme and see how it is done using React Testing Library.
Focusing an Element
The React Testing Library focuses on testing accessibility through user interactions, including focus. The enzyme also supports checking the focused element and simulating events.
In Enzyme:
In React Testing Library:
Selecting Elements
Enzyme gives you different ways to choose which elements to select, such as by using CSS selectors. React Testing Library on the other hand uses more semantic queries, such as getByRole, getByText, and getByLabelText, which simulate how users interact with the application
In Enzyme:
In React Testing Library:
Updating State and Props:
Enzyme provides methods for updating the state and props of a component, including setState, setProps, and setContext, whereas the React Testing Library does not provide methods for directly updating state or props. Instead, you should simulate user events, such as clicking a button or entering text into an input field, to trigger state and prop changes.
In Enzyme:
In React Testing Library:
Lifecycle Methods
Enzyme provides methods for testing component lifecycle methods, including componentDidMount, componentDidUpdate, and componentWillUnmount.
React Testing Library does not provide methods for directly testing lifecycle methods. You should instead test the effects of lifecycle methods by simulating user interactions and watching how the UI changes as a result.
In Enzyme:
In React Testing Library:
Debugging
If you're working on a React project and need a powerful debugging tool, you have a few options to choose from. Enzyme has a debug method that lets you print the component tree to the console. This can help you find problems with your tests.
React Testing Library also has a debug method, and apart from that, it also provides a screen object that you can use to interact with the rendered components directly in the console.
In Enzyme:
In React Testing Library:
Advantages of React Testing Library
One of the main reasons why the React Testing Library is gaining popularity in the testing community is the simplicity it provides.
According to us, the following reasons contribute to its wide acceptance:
- User-centric approach: React Testing Library provides a user-centric testing approach that encourages developers to test their components in a way that simulates how a user would interact with the app.
- Semantic queries: The library emphasizes using semantic queries like getByText, getByRole, and getByTestId to select elements in the DOM, making tests more readable and maintainable.
- Optimized for functional components: React Testing Library is optimized for functional components, which are simpler to test than class components. The library has a clean and straightforward syntax, which makes it easy for developers to write and understand tests.
- Well documented: React Testing Library has excellent documentation and resources that help developers get up to speed quickly.
- Focuses on accessibility: React Testing Library encourages users to write more accessible code by avoiding the use of the querySelector API and instead using semantic queries that are more meaningful to users with disabilities.
- Cross-platform testing: React Testing Library is not just limited to React web applications but also works with React Native. This means developers can use a single testing library for both web and mobile applications, which can save time and effort.
Limitations of React Testing Library
Even though the React Testing Library (RTL) is a strong testing library with lots of advantages, there are still some difficulties that developers might run into. Here are a few challenges that developers may face:
- Limited control: Unlike other testing libraries, React Testing Library does not offer the same degree of control over the component tree. It is instead designed to test how users interact with an application. This can make it difficult to test certain edge cases or complex interactions.
- Unable to select the Component state: React Testing Library has the obvious drawback of not being able to test for the state of components. It is generally discouraged to test for the state of the component but sometimes it is necessary to test for the state
- Accessibility testing: React Testing Library encourages developers to make their applications more accessible but testing for accessibility can still be a challenge. It requires a good understanding of accessibility best practices and may require additional tooling or expertise.
- Integration testing: React Testing Library is great for testing individual components in isolation, but integration testing can be challenging. The interaction between multiple components or the overall functionality of the application may require additional setup and coordination.
- Performance testing: React Testing Library is focused on functional testing and user interaction, so it doesn't provide built-in tools for performance testing or load testing.
During the process of migrating your code from Enzyme to the React Testing Library, you may encounter errors that could halt your progress. To overcome this challenge, you can use Zipy as your error monitoring and debugging tool. Zipy allows you to log real-time error messages, providing you with a better debugging experience and helping you to overcome any obstacles encountered during the migration process.
Ready for Migration?
Congratulations on reaching this far! You’re a fantastic reader!
There is no one "best" tool for all situations. Each tool has its own strengths and weaknesses and can be better suited for certain tasks than others.
But from an up-to-date point of view, Enzyme is outdated, and we should consider migrating to more popular libraries like React Testing Library. In this detailed blog, we have covered all the aspects that you need to know while migrating your test suite from Enzyme to the React Testing Library.
Now that you know how to migrate to the React Testing Library, you can get started.
Happy Testing!


.webp)