React is a front-end JavaScript library built by Facebook for creating user interfaces for websites. According to the Stack Overflow 2022 survey, React was the second most common web technology used by Developers after Node.js.
React is based on component design, which means everything in React is a component. Hence every component should have its own test and should be tested in complete isolation. In this blog, we will look at React Testing Library which is one of the top testing libraries in React. React Testing Library is a JavaScript Testing Library for performing unit tests on React components.
Before we check how to write Unit tests in React, let’s understand a little bit about Testing and what Unit Testing exactly means.
Testing
In software development, testing is the process of confirming and validating the program's behaviour prior to its public release. Any anomalous conduct or mistake discovered throughout this procedure has been addressed and rectified. Testing can be done manually or automatically by a developer who writes tests that launch the application and look for issues while it's running.
Unit testing, end-to-end testing, integration testing, acceptance testing, and other testing methods are common. But unit testing is the most crucial one for our blog.
What is Unit Testing?
Every component of an application is tested separately during a process known as unit testing. For that component, all necessary dependencies are mocked.Determining if a component acts as expected and satisfies requirements is the primary goal of writing a unit test. Any mistake found now is critical since it reduces the amount of time needed for later debugging.
Everything in React is composed of components, as we have already covered. Every component has a unique state and carries out a particular task on the user interface. Errors or failures in one component will have an impact on its offspring components. It is therefore required to examine the behaviour of each component separately. It is exactly what React Testing Library does!
What is React Testing Library?
The React Testing Library is a lightweight testing package built on top of the DOM Testing Library. This library contains all the utilities and helpers to test React Components in a User-Centric way. The React testing library is a replacement for AirBnbs Enzyme.
The Enzyme Library was used to test the component's state, props, and internal implementation details while React Testing Library only tests the DOM nodes and UI Elements. If you are using Enzyme in your application, it is possible to Migrate from Enzyme to React Testing Library.
In React Testing Library we are not concerned with how the component behaves internally. We are only looking at how the component interacts with the user. So the library will not care if the component takes any route for finding the solution if the end result matches what the developer wants. Hence even in the future if a developer wishes to refactor his code, the test won’t fail if the output is still the same!
React Testing Library is used to write tests but we need a test runner to run our tests and give us a report on whether or not the tests failed. This is where we will use a JavaScript Testing Framework called Jest.
Jest is a JavaScript test runner that finds tests, executes them, and determines if they passed or failed.
React Testing Library and Jest are not alternatives to each other. Both perform different tasks and work together to perform unit tests on React Components.
Since there are a lot of options for testing libraries to choose from, it is necessary to compare react testing libraries and find the one that fits the project requirement.
Writing Unit Tests in React
Let's write some tests in the following part now that we have a better understanding of React's unit tests.
We assume you are familiar with React before starting this example. Before moving on to testing, we strongly advise that you familiarise yourself with React if you're new to it.
All the code that we will see is already present on my GitHub. You can access it here.
Setting up the Environment
Let’s set up a new React application using ‘create-react-app’
Using npx:
Using yarn:
We are using "create-react-app" as it has Jest and the React Testing Library pre-configured. A example test case has been written specifically for us.
Other approaches to building a React application would need installing the Testing packages independently. If you're building your own application, make sure to install Jest and the React Testing Library.
Running the Test
In our React application we can see that an ‘App.test.js’ file is already present in the src folder. This is a sample test file provided by ‘create-react-app’.

To run this test, we will open the terminal and type ‘npm test’ or ‘yarn test’. This command will run the test in watch mode.
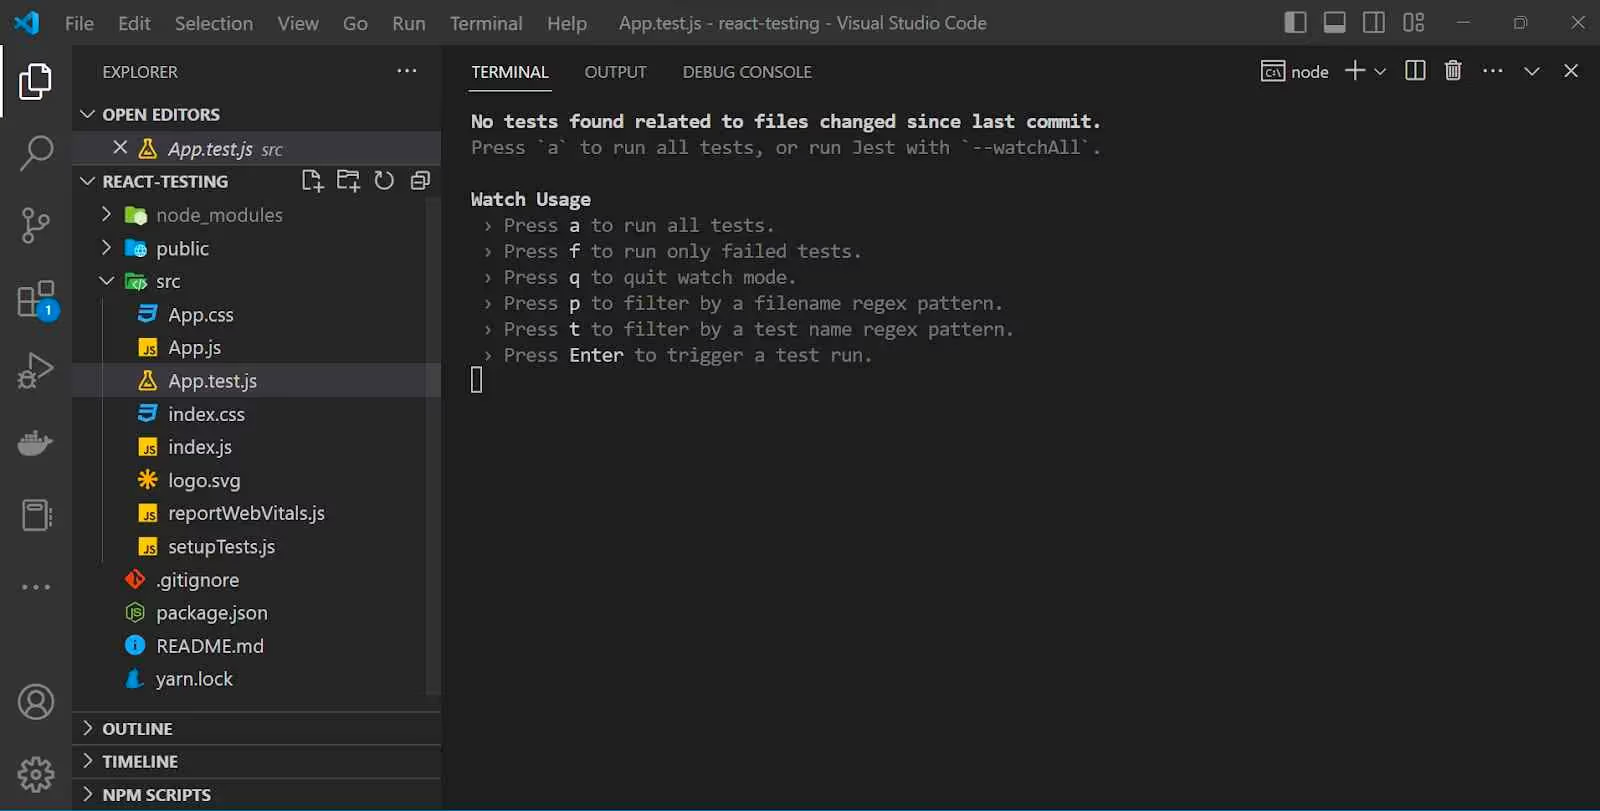
You can see a lot of options here to run the test. Typing ‘a’ will run all the tests from the application.
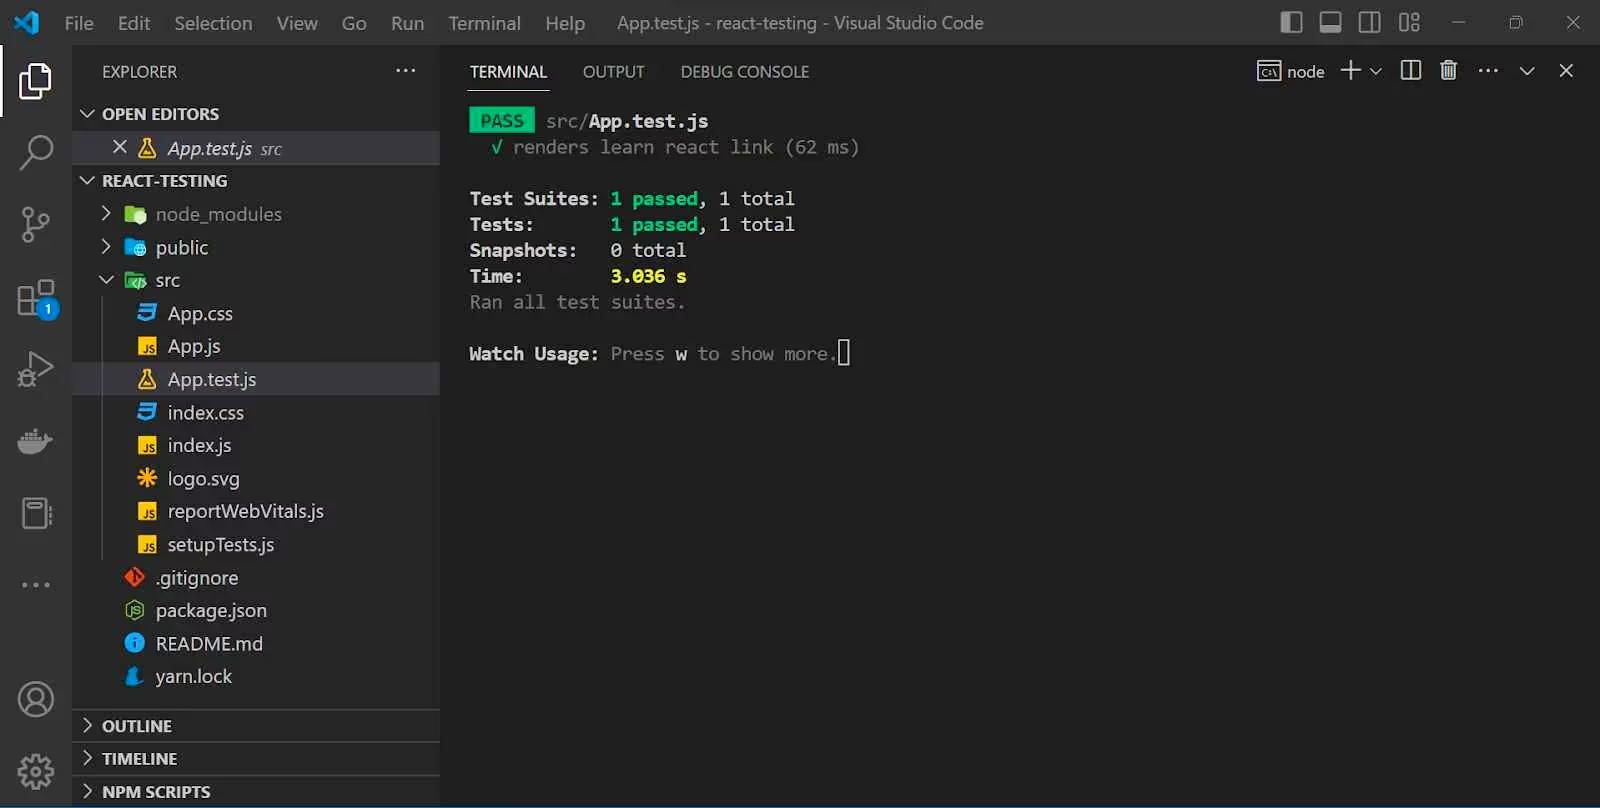
Our first test is a success! Now let’s move on and understand what a test in React looks like.
Anatomy of a Test in React
In React, a test file ends in either ".test.js" or ".spec.js." The programme locates all the files with these extensions to run when doing testing. Furthermore, our tests file may be identified by putting it inside the '__tests__' subdirectory.
To write a test, developers typically utilise a ".test.js" file. This file is stored with the Component JSX file at all times. As a general practice, a folder named after the component is created, and its JSX, test, and CSS files are stored inside.
- - - Components
- - - - - - Component-Name
- - - - - - - - - Component.jsx
- - - - - - - - - Component.test.js
- - - - - - - - - Component.css
We use a ‘test()’ function to write a test case. The test function consists of three parameters - the name of your test, a testing function, and a timeout for asynchronous tests. The default timeout is 1000ms.
'it()' can also be used to indicate a test case. "test()" and "it()" are interchangeable and perform the same function.Using the'render()' method, we render a component on which we wish to run tests inside of a test case function.
We utilise the Testing library's queries to choose the component's elements. There are two sections to this questions. The search type is the other, and the variant is the first. For instance, we use the query "getByText()" in our sample test case; the variant is "get...," and the search type is "ByText."The six query variations are displayed in the table below.
In summary, the getBy query can be used to retrieve a single element. If the element is missing, however, this query will return an error. Therefore, utilise queryBy when we wish to assert that the element is not present.
Findby and findAllBy should always be used for asynchronous tasks. You can use getAllBy, queryAllBy, and findAllBy to retrieve numerous entries.To locate the elements according to certain criteria, search kinds are utilised. Here are a few typical search categories.
After we query the element which we want, we can assert some statements based on the test cases. A single test case can have multiple assertions. To make assertions we can use ‘expect()’. The queried element is passed as a parameter to the ‘expect()’ function and a method is called which specifies the condition for assertion.
In the above code, we are expecting the ‘linkElement’ to be present in the Document using the ‘.toBeInTheDocument()’ method. Similar to this method, we have numerous other methods to check if present, if not present, if true, if false, and more. Some common ones are mentioned below.
- toBeInTheDocument
- toBeDisabled
- toBeEnabled
- toBeInvalid
- toBeValid
- toBeVisible
- toHaveAttribute
- toHaveClass
- toHaveFormValues
- toHaveStyle
- toHaveTextContent
- toHaveValue
- toHaveDisplayValue
- toBeChecked
- toHaveDescription
A ‘describe()’ block represents a test suite. A test suite can have one or more Test cases. It is not necessary for your tests to be inside a suite. As a standard practice, all similar test cases are kept inside one Test Suite.
Now that we have understood what a test in React looks like, it’s now time to write our first test.
Writing our First test
We will create a component folder that will have all our Components and their test file. Inside the components folder, we will create an Application Folder for the application component. Inside this, we will add an ‘Application.js’ file and an ‘Application.test.js’ file.

Let's add some basic HTML inputs and some heading text inside our ‘Application.js’ file to test.
Now let’s move on to the ‘Application.test.js’ file and write our first test to check if the heading “Login Form” is present on the screen
Application.test.js
As you can see in the above code, we have rendered the Application Component, selected the heading element by ‘getByText()’ query and asserted it to be in the document using ‘.toBeInTheDocument()’ method. Before running the test we will delete the sample ‘App.test.js’ file to avoid confusion. Now let’s run the test and check if the test passes.
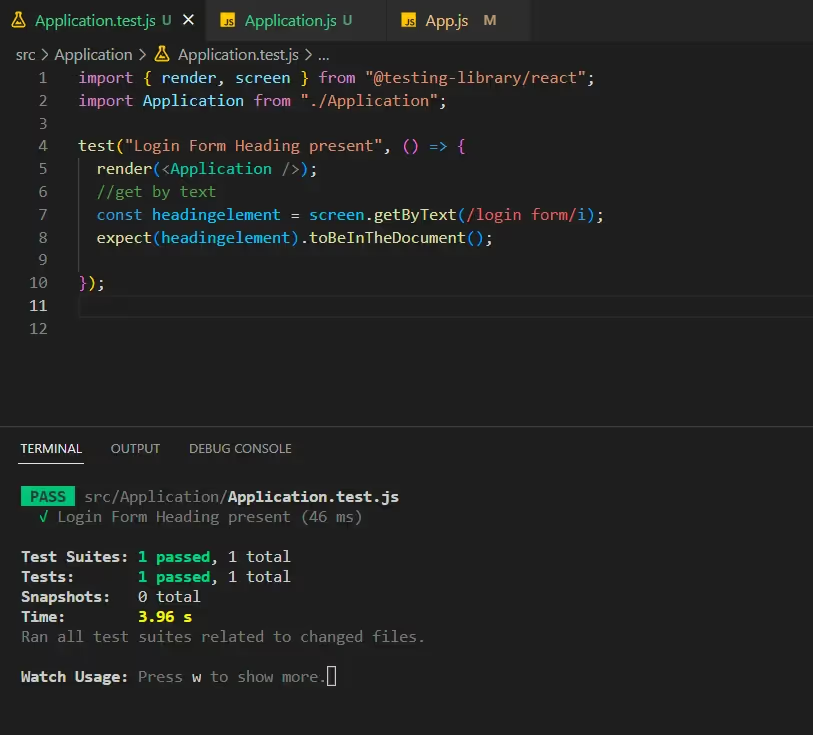
Voila!! Our first test ran successfully! Just to make sure our test is asserting the text correctly, We will change the heading from ‘Login Form’ to ‘SignUp Form’. Now, let's run the test again.
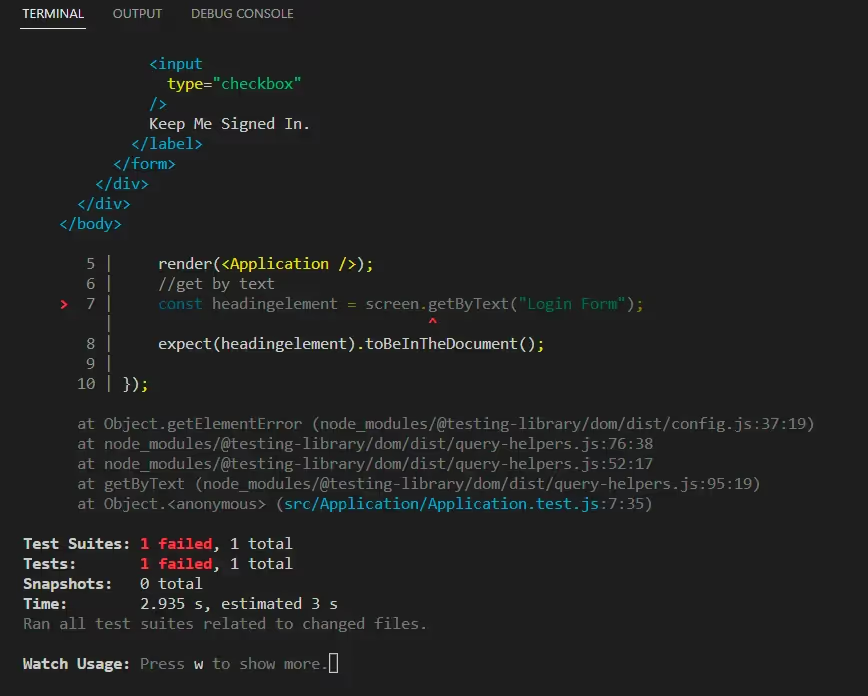
Our test did fail! If we check the log, we can find the exact reason why the test failed. This will help in debugging the code once the application grows.
In some cases, we might not have the exact text which you want to test. In that case, we can make use of regular expressions.
For example, in the below code login form will be selected and the case of the text will be ignored.
Let’s write another test but this time using ‘getByRole()’ query.
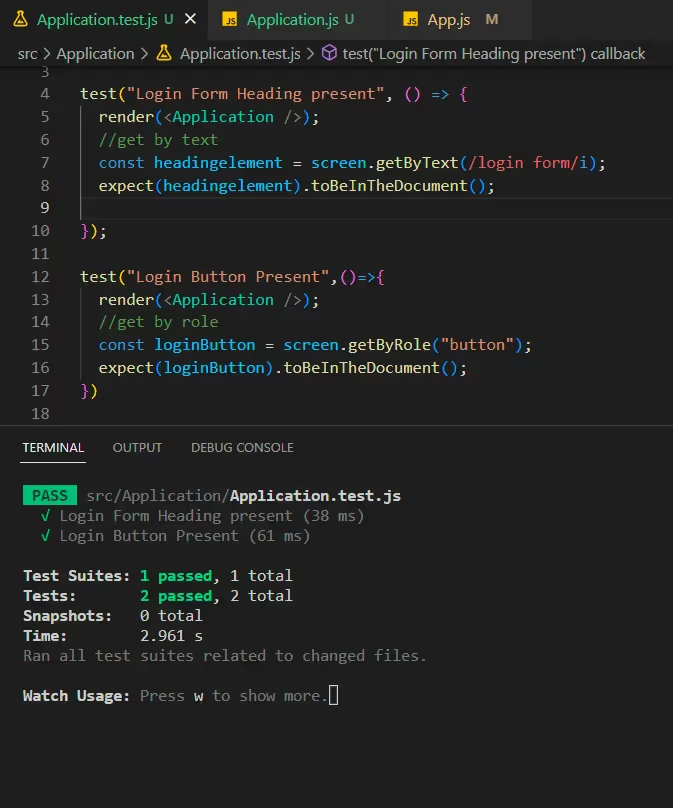
In the above code, we are testing if a Login button is present on the screen. We are selecting the button by the role ‘button’. Every element in HTML has a specified role. For example, <h1>- <h6> tags have heading role, <button> tag has button role, etc. You can find the entire list of roles here.
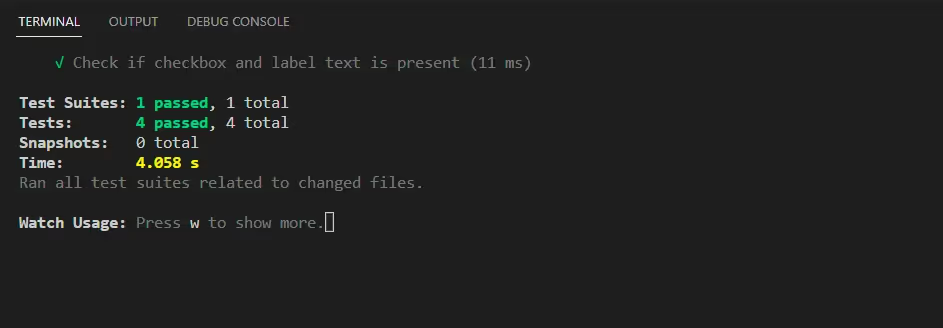
Let’s write some more tests with variations of the query and run the tests.
Testing User Interactions
Up until now we have done tests on the elements present on the screen. In this section, we will test the UI after some user interactions. For this test, we will create a separate folder with the Counter component.
Counter.js
We have added some basic counter logic which will increment the state variable with every click of a button.
Counter.test.js
We have added two tests, one which checks if the initial count is zero and other that checks if the button is present on the screen.
Now let’s write a test that will check if the count is updated once the user clicks on the button. To test such user interactions, we can use ‘fireEvent’ from the ‘@testing-library/react package’.
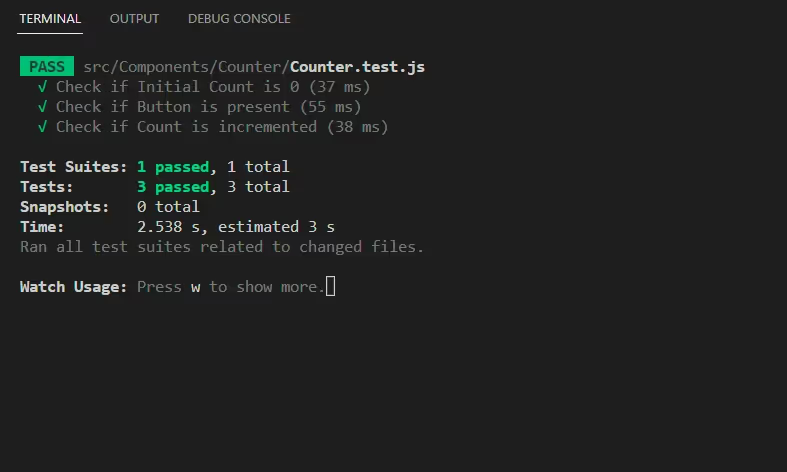
As shown in the above code, we are selecting a button from the UI and firing a single-click event using fireEvent. Since we click the button once, the initial count will be incremented to 1 and hence the assertion is true and our test is passed successfully!
Debugging the tests using React Testing Library
Debugging is an important feature and can save a lot of time and effort while bug solving. Fortunately, the @testing-library/react provides us with enough methods to debug our tests.
We will modify our test from the last section as below. We have added a screen.debug() method after the render method. This method shows an entire DOM structure present in the component.

Never Commit your debug statement in your code. Always remove the screen.debug() statement.
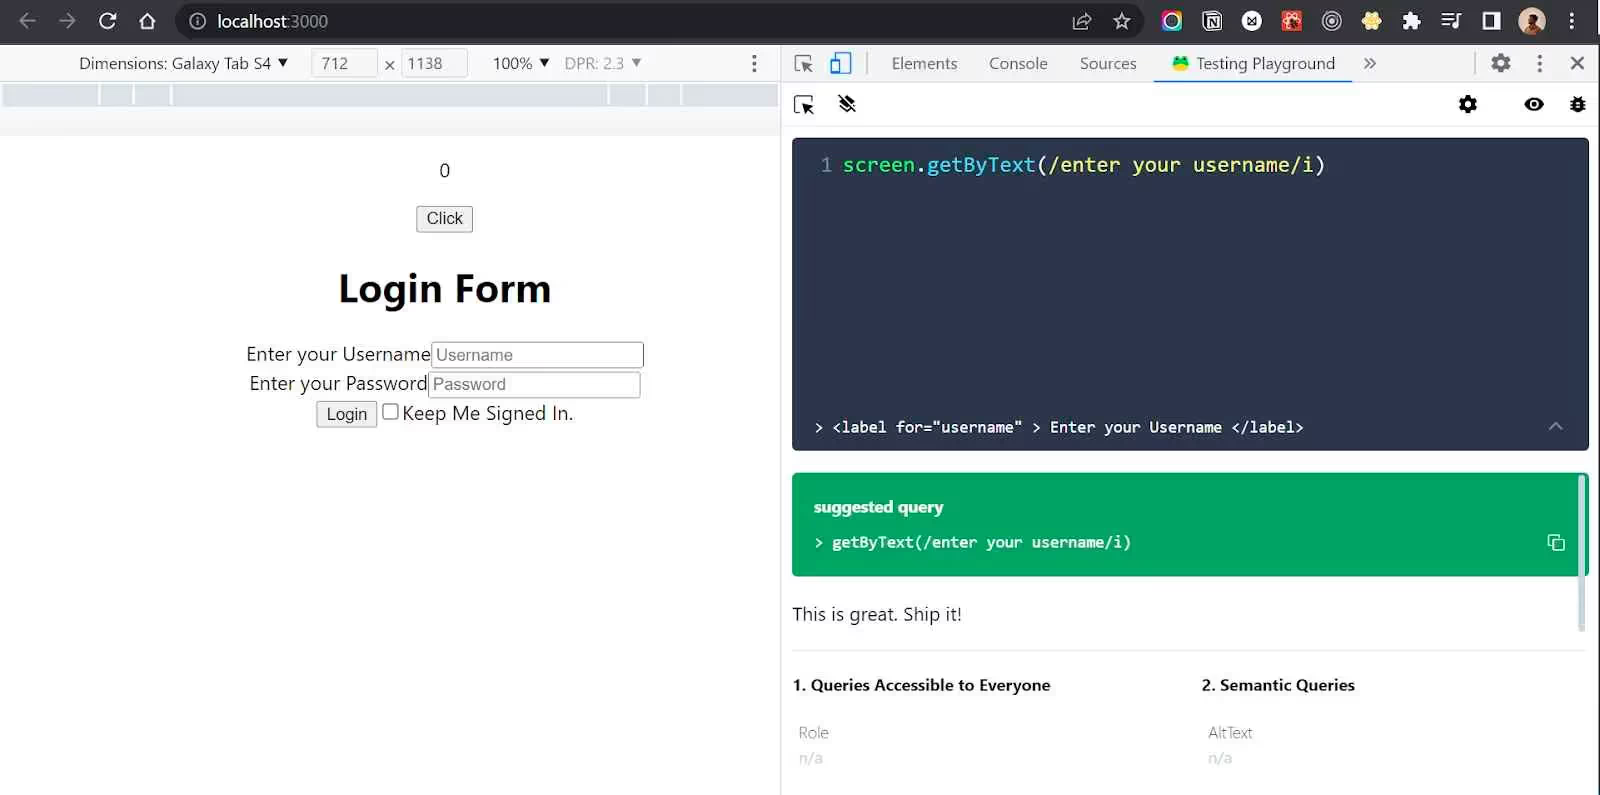
Another useful tool for debugging is the Testing Playground Chrome extension. You can use this extension to find if the element is present, and how to target them accurately. Once you install the extension you can open it from Chrome Dev tools.
Testing Asynchronous Operations
Asynchronous operations take time to finish their execution. Fetching data, sending data, saving data, and waiting for a timer are all examples of Asynchronous Operations. In this section, we will see how we can test components with Asynchronous actions.
We will create a CounterByDelay folder inside the Components Folder. Our‘CounterByDelay.js’ and ‘CounterByDelay.test.js’ files will go here.
CounterByDelay.js
In the above code, we have added a ‘delayCount()’ function which sets the count + 1 after a delay of 0.5s. Let’s write a test that waits for the count to update before testing.
Here we are using a waitFor() function from @testing-library/react which waits for the count to update.
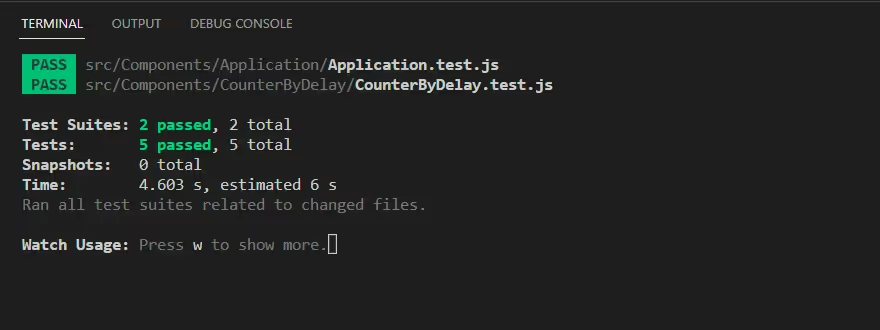
Another use case of Asynchronous tests is testing an element that is currently not inside the Component but will eventually be added.
Mocking and testing HTTP requests
One of the common responsibilities of the UI is to send and receive requests from an API over HTTP protocol. We can write a function to test the API but that would result in a lot of unnecessary API requests. In case your API is billed for every request, you will be billed for all the requests that you sent just for testing. In such cases, we can mock an API and test the response.
For mocking API while testing, we will use a package called mock-service-worker.
Let’s start by installing msw.
Once msw is installed, we need to create a component that sends a get request to the API. In our case, We will be creating a Users component which will get 10 users with the help of JSON Placeholder API.
Users.js
We have created a simple Users component which will render a list of users and will show error in case something goes wrong. Now before we start writing tests, we must set up a dummy server and a handler that will handle our requests.
I am creating a mocks folder in src which will have two files. Let’s add our first file ‘server.js’ here.
Server.js
You can find this code in the official documentation here.
Let's create a second file named handlers.js in the same folder which will handle all our HTTP requests and responses.
handlers.js
This file exports a handler which has a rest.get() function with two parameters. The first one is the API that we want to intercept and the second is the handler that mocks the API. For mocking, we are using an array of 3 users which resembles the response from the JSON Placeholder API.
Our final change is in the ‘setupTests.js’ file. Replace the existing code with the below code.
setupTests.js
In the above code we are setting up a server for all the requests, after every request, we are resetting the server and after all the tests are performed the server gets closed.
This is what our folder structure looks like
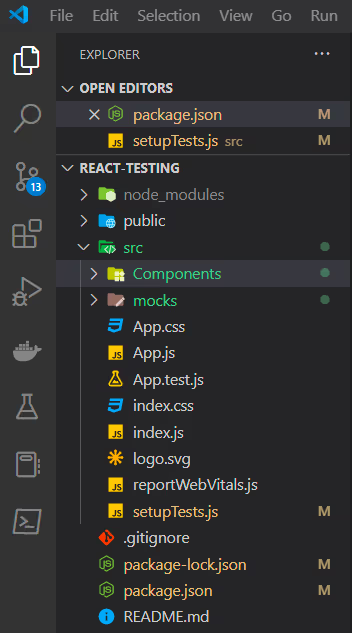
Now with all our setup done, let’s write some tests for testing the API.
In the above code we are testing if the API returns 3 values. The 3 values are the ones that we are sending through the mock server. Let’s run the tests.
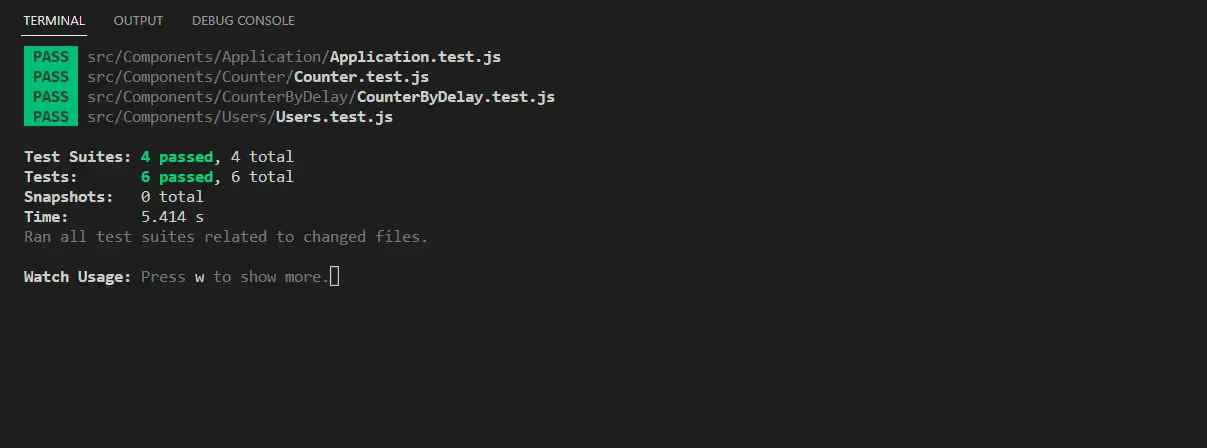
As you can see, all the tests passed successfully. Just to verify if our test is working, change the value to have a length of anything other than 3. We will change it to 4 and now our test should fail.
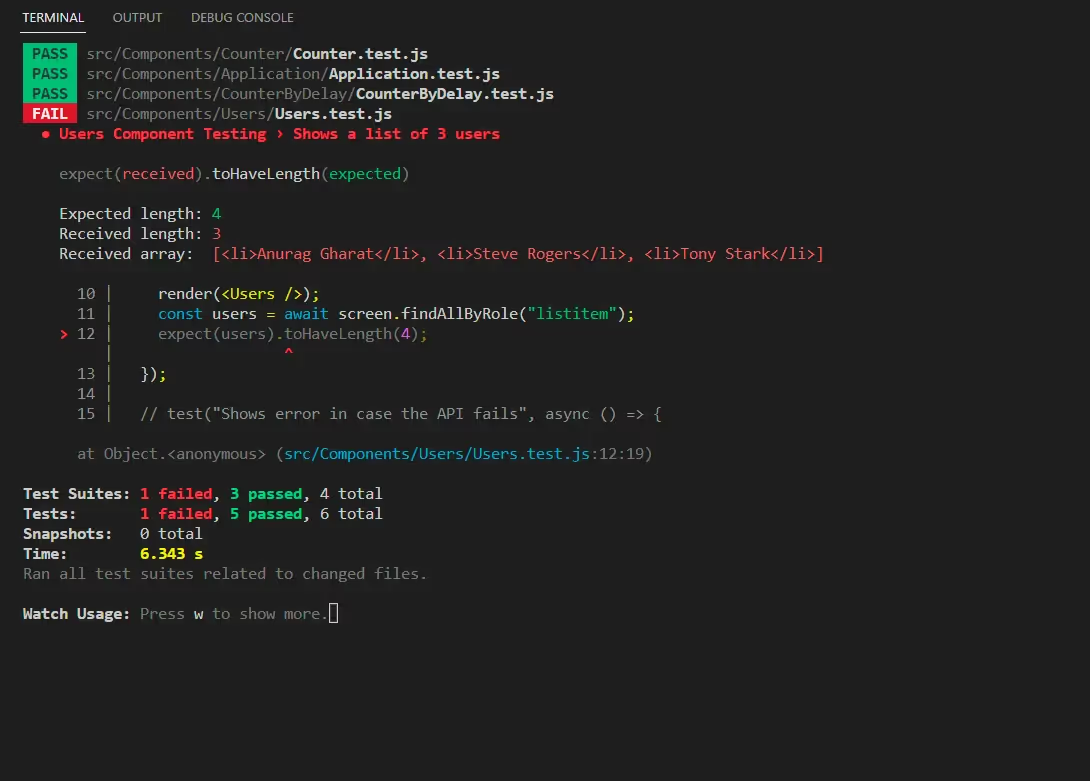
Great! This means our Mock server is working!
Just as we tested the response of the API, it's always a good practice to test the error handling. If you check the Users.js code I am already handling the Error using setError(). This means in error cases, the component should render “Error while fetching users” instead of the users. Let’s write a test for this scenario.
In the above code, we created another test that will test the error. Here inside the test, we are setting up a server that returns an error with status 500. Then we are asserting the Error text to be present on the screen. Let’s test this test case.

Code Coverage
Code Coverage means how much your code has been executed while running the test. Consider this a kind of report consisting of all our test cases. In order to create a report we must first add a script in our package.json file. Open your package.json file and add the below line in the scripts object.
The above line will add a coverage script for your project. In order to run the script you can type
Or
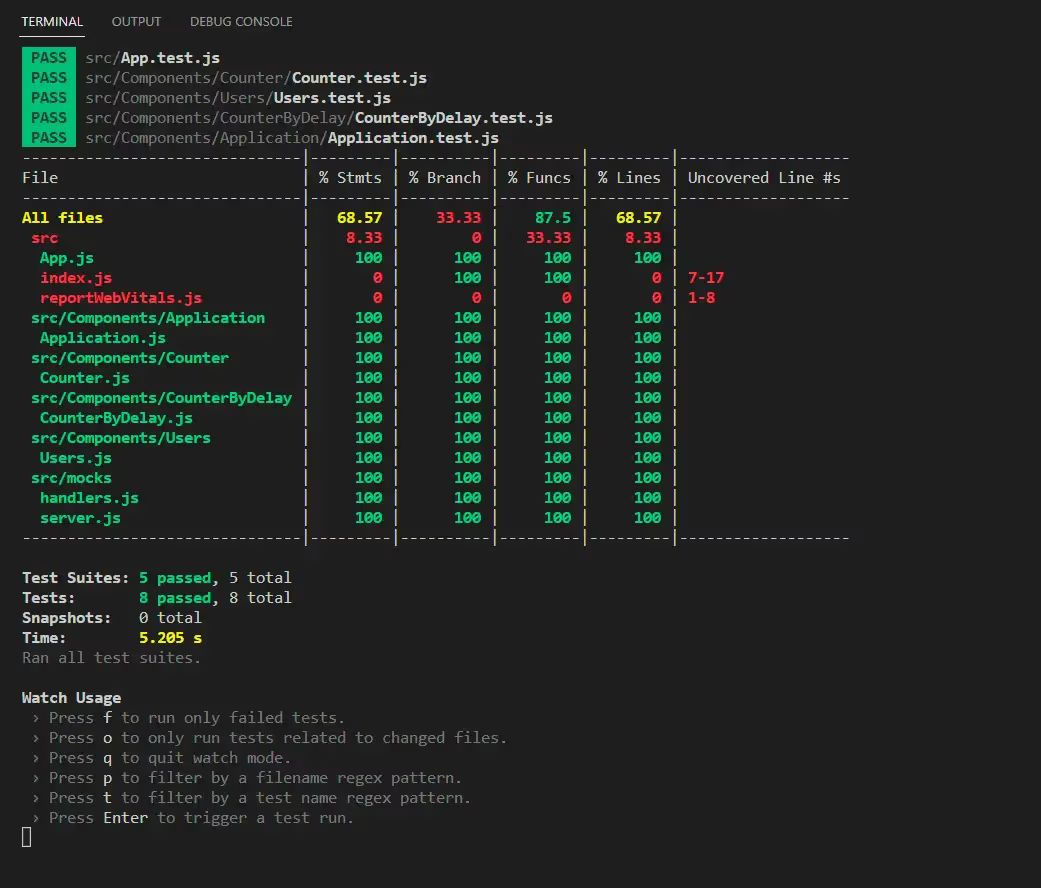
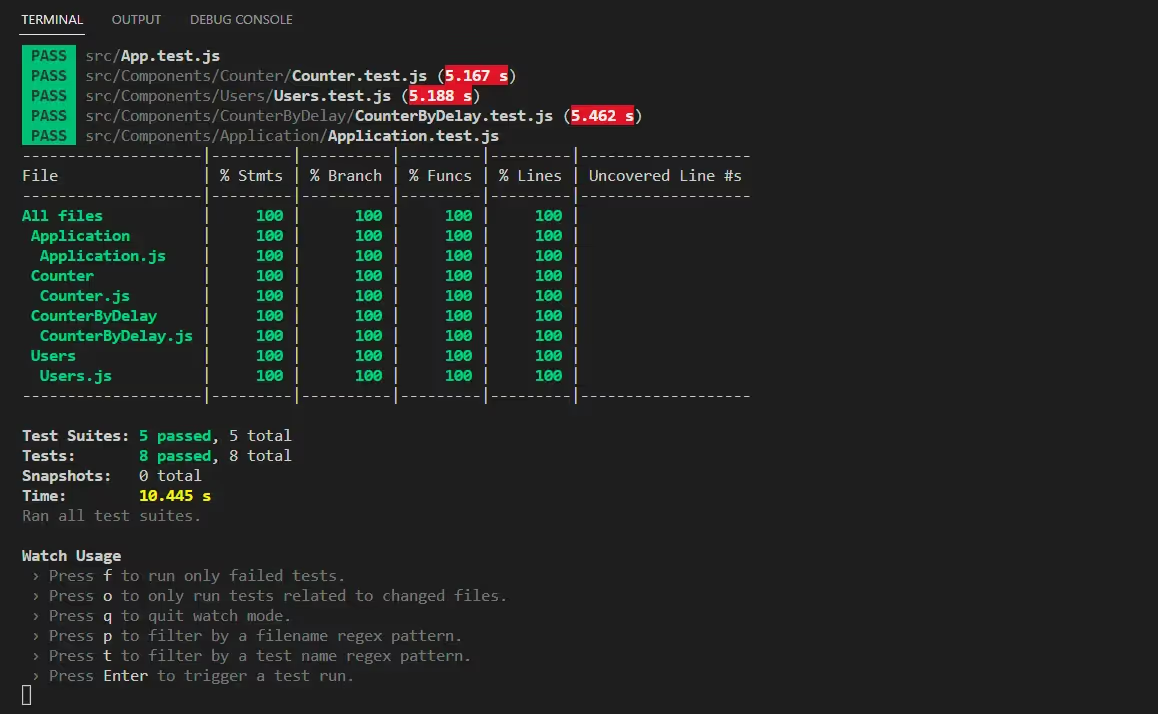
We now have a report on all the files and the test coverage. But if you see closely some unnecessary JS files are also present. We can ignore them by adding an extra flag at the end of the command.
Now if we run the command again. A new coverage report will be generated with only the files present in the Components folder.
You can find all the code on my GitHub.
Best Practices
Now that we have understood the React Testing Library, let’s see some best practices we should follow.
- Try the user interface instead of the implementation specifics: The User Interface is the only thing that is tested using the React Testing Library. All that is tested is the user's interaction with the UI. This library should not be used for testing anything that occurs in the background.
- Use getBy, queryBy, and findBy appropriately: Each query carries out a distinct function. If you use one instead of the other, the test might not pass. Use queryBy only, for instance, if your query is capable of returning a null result. The test will fail if getBy is used.
- One Assertion per Test Case: You should only make one assertion for each test case. This will enable you to test a scenario at a time and speed up troubleshooting in the event that a test fails.
- Mock the external dependencies: Any external dependency like an API or local storage data should be mocked. Making unnecessary API requests will increase your load on API and slow down your testing.
- Keep your code coverage at 80%: This lowers the number of defects and is usually considered good practice.
- Avoid creating pointless and repeated tests: Tests for previously covered and tested material should not be written. For instance, you don't need to create a test to determine whether the input is present on screen if you are writing a test to determine whether the input type is a checkbox because this is already covered in the checkbox type check test.
Wrapping up
Unit Testing should never be avoided if you want your application to have minimum errors and defects. The React Testing Library is a great package to test React applications by generating tests that closely resemble user scenarios.
During debugging React applications it is important to understand where the error occurred or where exactly the customer faced the issue. This is where you can use Zipy and monitor real-time sessions and debug your React code quickly. Zipy.ai combines stack trace and session replay to make it really easy for developers to identify errors and debug them.
Coming back to this blog, we learned about performing Unit Tests in React using React Testing Library and Jest. We wrote some tests and studied their variations. In the end, we saw how we could create a report for all our tests. We hope you found this blog helpful.
Happy Coding!
lack
.svg)


.avif)


.webp)